
Leggy Froggy
Free Tutorial and Pattern
Welcome, fellow crafters! Today, I’m excited to show you a delightful project that combines the efficiency of a circular knitting machine with a bit of crochet. We’ll be making an adorable Leggy Froggy that’s not only easy and simple but also fast and incredibly fun to create. If you’ve never crocheted don’t worry. It’s very simple and I show you how in my beginner crochet video tutorial as well. So, grab your materials and let’s get crafting!
Video Tutorial:
First off, I’d like to mention I have a Leggy Froggy video tutorial here that can assist those who prefer a visual pattern tutorial for the leggy froggy using a circular knitting machine.
Materials Needed:
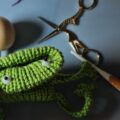
- Red Heart Soft Yarn, Guacamole
- Scissors
- Addi 22 Pin Circular Knitting Machine
- Bent tip darning needle
- Stuffing (yarn scraps or polyfil)
- Safety Eyes
- Crochet Hook (5mm Prym)
- Small amount of black and pink yarn (~8-12 inches)
- Safety Eye Auxiliary Tool (helps attach eyes and save fingers!!)
Step 1: Circular Knitting Machine
Start by using your 22-pin circular knitting machine to knit the body of your Leggy Froggy. Cast on with waste/scrap yarn (5 rows minimum). With your main color yarn, knit 40 rows. Cast off with waste/scrap yarn (5 rows minimum).
Step 2: Close the Tubes
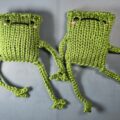
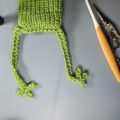
Close both tube ends using a crochet hook. Find where you cast off and count from the yarn end back to the 11th stitch of your main color yarn. Place your hook inside from the outside in and then grab the stitch above (12th) and pull thru your loop. Next, grab the stitch on the opposite end (10th stitch) and pull thru the loop on your hook. Continue grabbing the stitches on opposite ends and pulling thru the hook. After the last stitch you will grab the yarn end to pull thru the loop to fasten off. Remove waste yarn. See photo or video for reference. Tuck one end of the tube inside the other end making a pocket.

Step 3: Crochet Legs and Arms
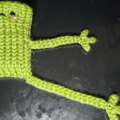
Now, let’s add some crochet magic to give our froggy some character. Starting with the legs:
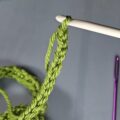
- Slip knot, insert hook into bottom corner of the closed end of your frog. (See photo for reference) Chain 1, Single Crochet into the same stitch.
- Chain 20.
- Slip stitch into 2nd and 3rd chains from the hook.
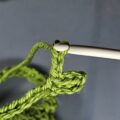
- Chain 3, slip stitch into 2nd and 3rd chain from the hook
- Chain 3, slip stitch into 2nd and 3rd chain from the hook, Slip stitch into the stitch you slip stitched into in row 3.
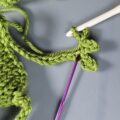
- Single Crochet down the rest of the chain and into the first stitch you started in. Fasten off. Tie ends and weave in.
Do this again on the opposite corner to finish off the legs.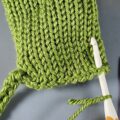
Arms:
- Count up 9 stiches from one leg. Slip knot, insert hook into that stitch. Chain 1 and single crochet into the same stitch.
- Chain 15.
- Slip stitch into the 2nd chain from the hook and then the 3rd chain.
- Chain 3, slip stitch into the 2nd and 3rd chain
- Chain 3, slip stitch into the 2nd and 3rd chain. Slip stitch into the stitch you slip stitched into in row 2.
- Single crochet back down the chain and into the first stitch you started in. Fasten off, tie ends and weave in.
Step 4: Adding the Details
Add safety eyes to the frog.
Sew the mouth between the eyes.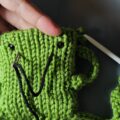
For that extra touch of cuteness, sew a small amount of pink yarn under each eye. 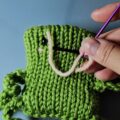
See photo of the facial features for reference and placement.

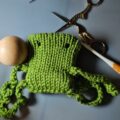
Step 5: The Finishing Touch
Don’t forget to stuff your froggy, giving it a nice plump shape. Now, you can sew the top of the leggy froggy head closed using the main color yarn and your darning needle. Tie off and weave in yarn ends.
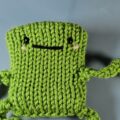
Step 6: Show Off Your Crafty Creation!
Congratulations! You’ve just crafted your very own Leggy Froggy using a circular knitting machine and a little crochet. Now, it’s time to show off your creation to the world. Share pictures on your social media, or even consider selling them, they’re super popular right now!
Previous
Next
Conclusion:
Crafting a Leggy Froggy is not just a project; it’s a journey of creativity and joy. With your circular knitting machine and very basic crochet skills, you can bring this charming creature to life in no time. So, gather your supplies and get ready to create some adorable amphibian friends! By the way, this would make a great Back to School project for your child’s classmates as little take home gifts! For other ideas check out my blog post here.
Don’t forget to check out the full video tutorial on YouTube.
https://youtu.be/ygch2XcReZA
Disclaimer: The Amazon links provided above are affiliate links. This means that if you decide to make a purchase through these links, I may receive a small commission, without any additional cost to you. As an Amazon Associate, I earn from qualifying purchases. I suggest products that I believe could be beneficial, and your backing through these affiliate links contributes to the enhancement of what I bring to you. Your understanding and support are greatly appreciated. Thank you.